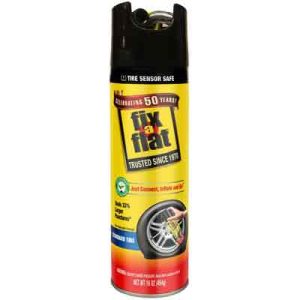
Yes, you can patch a tire after using fix-a-flat. Fix-a-flat is not a final solution to a punctured tire, it is only temporary relief.
Part of the repair of a punctured tire is patching, which can be done after using a fix-a-flat.
Fix-a-Flat is to a punctured tire, what first aid is to a deep cut. You still have to take the injury in for the doctor to stitch.
Consider Fix-a-Flat an emergency procedure to help you get through your journey in case of a flat tire.
It is a time-saving, cost-effective quick solution for a flat tire that happens in a circumstance where the next repair shop is miles away, you’re in the middle of nowhere, cars wheeze by but no one is likely to stop considering that it may be a lonely highway.
Or that crucial moment when you and your family are ready to go out on the town, but alas, there’s your car sitting awkwardly in the drive. You have a flat tire. A nail must have done it in.
You have a Fix-a-Flat in the trunk, you pull it out, punch it in the valve and in no time you are out on your way.
Fix-a-Flat is however not a permanent solution to the problem of your flat tire. Do you wonder if you can still patch the flat tire?
Table of Contents
How to patch a tire after using a Fix-a-Flat
Fix-a-Flat is an emergency solution to a flat tire. There is nothing in the component of Fix-a-Flat that prevents you from taking the tire in for repairs.
You are supposed to have your tire repaired within 3 days or 100 miles.
To repair a flat tire after you have applied Fix-a-Flat, these are the steps to follow:
Take the tire off the rim
Be deliberate here. Don’t rush the process. Especially if the repair is coming three days after you used Fix-a-Flat as directed by the product makers.
The mixture would still be in its liquid state and may splash. Of course, you have to be wearing protective clothing, gloves, and goggles to protect your eyes.
Carefully pull the tire out, scoop the remaining Fix-a-Flat mixture out of the tire with a small plastic cup.
Make sure to keep the waste away from where kids can find it.
Clean the tire properly for repair
It is important to clean out the Fix-a-Flat mixture out of the tire before beginning to fix it.
It is usually a mess inside the tire, the puncture hole is clogged by the time you want to repair so you need to free it of Fix-a-Flat residue.
Wash with soap and water
Fix-a-Flat is easy to clean using water and soap. Mix some liquid soap or detergent in water, make it foam.
Pour out the waste from the tire, use the soapy water, and shop rag to clean out the residue from the tire. The mixture is water-soluble and soapy water should get it out easily.
Sometimes though, you’d find the mixture has hardened in your tire. Not to worry. You can remove it by using any odorless mineral spirits available in your shop.
Hardware stores or art shops usually have mineral spirits you can purchase for this purpose.
Prepare to do it yourself
If you are an outdoor person like me, and you are on vacation in the countryside, a repair shop is likely too far away for any repairs.
This means you’d be doing your repairs yourself because you are prepared for this sort of unforeseen occurrence.
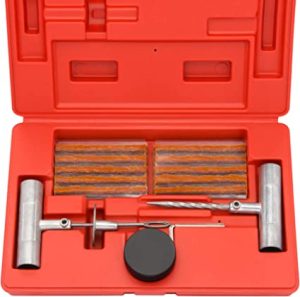
The tools you need are not expensive, and they are surely not as cumbersome to pack as spare tires are.
The next steps follow up with the regular method of plugging a hole in a flat tire.
Find the Puncture
This should be easy since the Fix-a-Flat mixture is usually sipping through already.
Mark the punctured spot with a marker if you have one handy, and if not, you may mark the spot with a piece of stone or any other material that is capable of leaving a harmless mark on a tire surface.
Remove the foreign object
If it’s a nail, you can get it out by using needle-nose pliers. Use a reaming tool, the one with a raspy edge, to make the hole slightly larger for the plug to go in more easily.
The reaming tool also rids the hole of dirt or other debris that the nail or foreign object may have let in. Your aim is to make the hole as large as a pencil.
A really thin nail will leave a tight hole behind, it may prove difficult to make this hole larger with a reamer.
To make it easier, turn the reamer tool slowly in a screwing motion all the way down. Do this repeatedly until it becomes easier.
You could do it like me by simply pushing the tool down into the hole, then yank it back up! Do this several times to get a bigger hole.
Install the plug
Here’s where things can get a little more difficult for you. But you can do it.
Remove one plug from its casing, flatten out one end of it with your needle nose plier, much like you’d do when you want to get a thread into a needle’s eye.
Push the flattened side of the plug into the eyelet of the installation tool. Grab the protruding end with your needle nose plier and pull.
Make sure that the plug is hanging out of the eyelet equally on both sides. Apply glue on the plug, and the leading edge of the installation tool. Then stick the installation tool into the hole firmly.
Make it go in as far as it can, see why the hole needs to be big enough? Now yank the installation tool back as hard as your strength can.
You should see the plug sticking out. Use a cutter to trim the excess body off.
Put air in the tire
Fill your tire up with air, check the appropriate PSI. Take it for a brief ride around so the heat can vulcanize the plug into place.
Check the PSI again. Make sure to keep your tools back in their place in your trunk in readiness for the next nail that sticks in your tire.
Let the tire repair professional know you’ve used a Fix-a-Flat
If you cannot patch your tire yourself, then this is the first thing to do when you take your tire in for repair.
How to remove a Fix-a-Flat from your tire

Do you wonder why we are back on this again? I know we’ve touched on this part of the process up there but it’s is important we go over it again.
I’ve heard some users talk about how messy it got after using a Fix-a-Flat, and how they had to ditch the tire and purchase a new one.
What was your experience with using a Fix-a-Flat? Did it harden and render your tire useless? Did you have to purchase a new tire?
It is actually easy to use a Fix-a-Flat and get it out of your tire, all that is required of you is to follow the instructions carefully, to the letter.
Note: After Using a Fix-a-Flat make sure to have the tire repaired within 3 days or 100 miles.
Not following these instructions may lead to difficulty when you want to remove the Fix-a-Flat. It is not a permanent solution to a flat tire, it is only for an emergency.
And make sure to tell the technicians at the tire repair shop about the Fix-a-Flat in your tire. GET FIX-A-FLAT HERE

The following steps are how you get the Fix-a-Flat out of your tire:
- Remove the tire.
- Remove the rim.
- Pour the excess or remaining Fix-a-Flat out.
- Make a mixture of soapy water.
- Clean with paper or rag.
Remove the tire
It is impossible to remove a Fix-a-Flat from the tire without unmounting it from the car. Have your tools ready: a jack, and tools to remove the bolts.
Remove the rim
It is also important to get the rim off the tire too. Here’s where some users claim that Fix-a-Flat messes the rim is valid.
And it should mess it, it is fluid. And it can be washed off easily using soap and water.
Pour the excess Fix-a-Flat away
Now that you have exposed your tire, the excess Fix-a-Flat can not be reused. You are free to throw it away, there’s no need to keep it for later use.
But make sure to dispose of it safely. Be mindful of your environment and kids.
Make a mix of soap and water
Fix-a-Flat is soluble in water, which means, it dissolves easily in soapy water. Use soapy water to wash your tire to get all traces of Fix-a-Flat out of it in preparation for repairs.
And if you aren’t doing the repair yourself, be sure to alert the guys at the shop of the presence of the Fix-a-Flat.
Clean with paper or rag
You can now dry off the tire with a rag or paper. Your tire now is ready for comprehensive repair.
How long is it possible to drive with Fix-a-Flat in your tire?
You can drive with a Fix-a-Flat for a maximum of 4 days or 135 miles before you take your car tire for permanent repairs.
One of the fears a user may have is: how can I drive around with just that liquid in my tires?
They wonder if it damages their tire while it is in there. Since it is not a permanent solution to the flat tire problem, it is expected that a user would have found the closest repair shop to fix their tire.
Or if they were on vacation in an isolated area when the flat happened they’d find a repair shop within at least a 130-mile distance.
Other factors can influence how long you can drive with a Fix-a-Flat. They include:
The extent of the damage
Fix-a-Flat will not last long in a hole that is bigger than ¼ inches. The solution will last for about a day or two at most. The bigger the hole the less effective the Fix-a-Flat.
It is even less effective if the damage is in the sidewall. But Fix-a-Flat will sustain your tire just long enough to find a permanent solution in a tire shop.
The type of road you drive on
Driving on a rough, stony terrain reduces the effectiveness of the Fix-a-Flat. So road conditions also impact how long you can drive with a Fix-a-Flat.
Stones in the road can puncture the seal that the Fix-a-Flat has created in your tire.
Weather conditions
If the weather drops right after you use a Fix-a-Flat, then the effectiveness will reduce too. Avoid using the Fix-a-Flat sealant in winter because it freezes out then.
And this has happened to some users. A frozen Fix-a-Flat causes an imbalance in your tires leading to other damages, like tires wearing prematurely.


It’s intriguing to learn how this process enhances the tire’s structural integrity, resistance to wear, and ability to withstand varying road conditions.